Welcome to Tutorials by Vaybs
Here you find all my tag tutorials using Paint Shop Pro (I use PSPX) and Animation Shop 3.
They're all made with FTU elements ;) And if I'm doing my job right you might pick up a few new ideas and tricks on the way.
All links open in a new window;)
Layout tag is made with my Betsys Paradise Dream kit ;)
Have fun!!
Showing posts with label None Animated Tutorials. Show all posts

20 Aug 2012

Alice


Tutorial is made in PSP10


My supplies HERE
(these are my elements, not to be used for other tuts)

(Put the "Vaybs Nice Double" file in your Alien - Skin Eye Candy 5 Impact - Settings - Glow folder)


Licensed artist work is by Jasmine Becket-Griffith


Plugins used;
Alien Skin Eye Candy 5 Impact - Gradient Glow

Font used is Redstar, you find it HERE


Let's start


Open all the supplies in PSP, 
we're working on the template ;)

on the rectangle layer, select all, float, defloat, add the brown paper as a new layer
move it to your liking,rightclick on the layer and chose Promote Selection To Layer, deselect, and 
delete the original paper layer.
Give it a double gradient glow using Alien Skin, colors #e3af71 and #342523. 

On the ellipse, select all, float, defloat, add the blue paper as a new layer
rightclick on the layer and chose Promote Selection To Layer, deselect, and 
delete the original paper layer.

Now move above the frame and start adding elements in this order;
doodleleafs, branch1, clock2, branch2, book, rose, clock1, wordart.

Move the doodleleafs to the left, so a bit of leaf and doodling is outside the rectangle.
Move clock2 to the top right corner and move the book in front below it, and then the rose in front
of the book, covering about half way up on the book page.
Duplicate the rose and mirror it, move it a little up, move the clock1 in front of the rose to the left.

Add your tube of choice and place it in the middle front of the tag.
I wanted a sharper color on my tube so I've duplicated it and on the duplicate I've changed blend mode
to overlay and reduced opacity to 50.

Move the branch1 up so it's sticking out of the clock on the right, hanging on the ellipse frame.
Duplicate the branch1 and move it so it's coming out behing the girls head.

Move the branch2 in front of the clock on the rightso the last leafs are hanging between
2 and 3 o clock. Duplicate it and move it above the book layer, so it's sticking out above the rose.

Move the wordart to the top left side, use the Manual Color Correction tool to change color on it to #b0660c
give it a double gradient glow, I've used colors white and #1c8c92.

Drop shadow I've used on all elements is -2, 2, 30, 4, black.
Added it twice on the tube.

type your name with the font Redstar, size 36, color #075c76, add a dobble gradient glow colors white and #075c76.

Remember to add proper ©, close the white background layer and save it as a png.

Think I got it all covered.


Hope you've had fun.

16 Sept 2011

Pole Dancer


Tutorial is made in PSP10


Supplies

My supplies HERE
(Not to be used for other tutorials)

Artist work is © Keith Garvey, licenced atm at PTE 

Font on wordart is Haettenschweiler, on my name I've used Pushkin


Now this is too easy to be called a tutorial, it's more a tag idea
that I had a lot of fun making, and when I started deducting elements 
it wasn't all that much I could remove lol
But I just know you can have a lot of fun with this one, 
cos I've made 3 of it myself already lol 


Let's start

Open the PoleDancertut template, delete the cr layer

Add the strippole on top, duplicate it and place one on each side on the front stage.

Find 2 tubes that look like they could be pole dancing, and arange them beside, in 
front or behind the poles, have fun with it! 
drop shadow on my girls is -2, -4, 30 7, white .

Use the manual color correction tool to recolor the curtain to suit your tubes.
If you don't have the tool yet you find the tut for it among my other tuts. 

On the back curtain layer, select all, float ,defloat, add a new raster layer, 
make a gradient, foreground/background, angle 90, Repeats 15, pick a light and a dark color
from your curtain, flood fill and deselect.

Add the discoball move it where you like it behind the curtain, recolor it if you feel like it.

Add the wordart on top, mine's placed in front on the stage, recolor it if you like.

My name's placed in the middle of the wordart, give it a black drop shadow.

Remeber proper ©.

That was all lol 

Have fun digging up potential strippers and I can't wait to see your results yay 


And you're done

Hope you've had fun.


Here are 2 others I did while I was at it.


8 Jul 2011

Strawberry Wine


Tutorial is made in PSP10 


Supplies

Jessica's "Strawberry Wine Sampler" kit HERE
thank you for sharing sweety!!

and my supplies HERE

Licensed artist work is by Ismael Rac 

Font used is BethsCuteHmkBold


Let's start


Open a new image 650x650, flood fill white.

Add the TabCluster, resize 80% and move it a bit down.

Add WordArt2 resize 40% and move it to the open space on the tabcluster, to make it more visible
duplicate it, merge down, duplicate again and merge down again, use the manual color correction 
tool to change color of it to a dark red (#851124).

Add my supplied strawberry basket, put it just below the biggest butterfly.
Add Strawberries, resize 20%, duplicate and put one on each side behind the strawberry basket, 
so only one strawberry is showing on each side of it.

Add Flower2, resize 20% add one on the top right corner of the tabcluster, duplicate and decorate 
with 2 on the thread in the front center (resized one of them to 80%). 
Duplicate and add one on the thread to the left, then duplicated the 80% one and added it behind the 
tabcluster to the left center so only half is showing.

Now we're adding elements behind the tabcluster, so move down to the background layer.

Add the Roses, resize 60%, move it to the left and keep the tip behind the tabcluster.
Duplicate it and on the copy change blend mode to hard light.

Add the Envelope, resize 50%, move it to the right behind the tabcluster.

Add the Hearts, resize 60% and delete the 2 biggest ones at the bottom, place the 
bottom heart touching the card in the envelope.

Add the LeavesHeart, resize 45%, duplicate it and drag one sticking up in front of the envelope
and one out on the left corner of the clustertab.

Then add your girl (halfbody) behind the cluster tab, standing in front of the roseheart.
(Mine's got a red shirt and blond hair) 

Now we've resized alot of elements and made them blury, so to sharpen them, use
Adjust - Sharpness - Unsharp Mask, radius 1, strength 100, clipping 10. to all the 
resized elements.

Drop shadow used is -1, -2, 30, 4, black.

Add my supplied strawberry sweet wordart at the bottom of the tag.

My name I've made red (#a50000) with a small double gradient glow of white and yellow
and placed it above the stitched Sweet.

When you're happy with it, just close the white background and save it as a png.


And you're done

Hope you've had fun.


31 Mar 2011

Thankful


Supplies

My tut supplies HERE

My Thankful heart wordart HERE

DBV mask 84 HERE


I'm using artwork by PTU artist Jennifer Janesko. 


Let's start

Open a new image 650 x 550 flood fill it white
The elements are added in this order
Frame, clock, boxes, buckets and lights.

Move the clock a bit to the left.
Move the frame to the right (adjust things as you go ;)
The buckets I've mirrored and moved down to the left, so just 2 of the orchids are showing.
The boxes are a little down to the right between the clock and frame.
And the lights are a bit in front of the open box but mostly in front of the big bucket.

To add the image in the frame, use the freehand selection too on Point to Point, go point to point
around the inner frame, go to the white background, rightclick and promote selection to layer,
add the tube you wanna use, and place it where it looks good, then promote selection to layer, 
deselect and delete the original tube layer.
Change color on your white promoted circle background, I've used a darker color from the lights on 
mine.
My drop shadow setting is; 0, 3, 30, 4.

I've used the Thankful Heart WA ("Cicero"), resized 40% and changed color to #7f2034 (same as I've used
on the frame background). Give it a little white glow and the same shadow as above. place it above and 
behind the clock.

Duplicate the white background, give it a new color, I've used #888e87,
add DBV mask 84 to it, merge group.

On my name I've used Freebooter Script in #7f2034 with a double glow white/#c46663, placed down to the right.


And you're done

Hope you've had fun.

25 Oct 2010

Steampunked Time


Tutorial is made in PSP10 


Supplies

Frame and Time wordart HERE

Yolanda's Steampunked Cluster HERE


My masks 09 HERE and 106 HERE

I'm using the artwork of  [URL=http://www.crisortega.com/]Cris Ortega[/URL] who's an FTU artist

Plugins used

Mura's Meister - Copies
Flaming Pear - Glare
Alien Skin Xenofex 2
Eye Candy 4000 - HSB Noise

Font used is called BickhamScriptFancy2


Let's start


Open a new image 650 x 650, flood fill white.
Add Sapphy's frame, use the selection tool on rectangle to select the text inside
and delete it.
Duplicate the frame and on the original,
add Mura's Meister-Copies - Wall Paper(roate) on default settings.
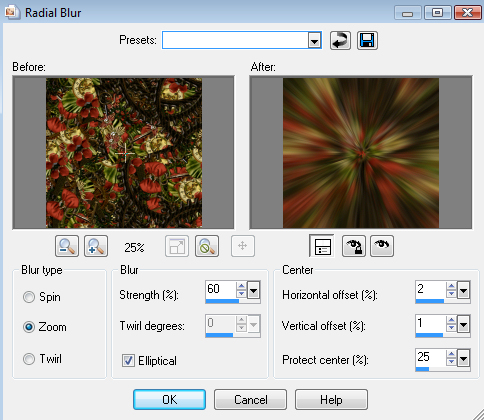
Then Adjust - Blur - Radial Blur with these settings


Dupliacte it and on the copy add DBV mask 106, merge group
On the original add DBV mask 09, merge group, duplicate it twice and merge the 3 layers
down on eachother. (stand on the last duplicated and merge down, then merge down again)
Add Alien Skin Xenofex 2 - Constellation to it at these settings


Use the move tool to move the frame a little to the right and a bit down, you can always
adjust it along the way ;)

Above the frame, add Yolandas Cluster, resize to 65%, Adjust - Sharpness - Unsharp Mask 
Radius 1, Strength 100, Clipping 10.
Then add Flaming Pear - Glare at these settings


And do the Adjust - Sharpness - Unsharp Mask once more.
Move it so it just covers the clock that's in the frame under it, see tag for reference.

Add the wordart, resize it to 25%, use the manual color correction tool to change color to #4e0c00 .
Then Effects - 3D Effects - Inner Bevel with these settings. 


Move it down to the left. I also gave it a subtle color mix using Eye Candy 4000- HSB Noise on these settings 


Now add the tube you wanna use, here's what I've done with mine, if you're using the same one ;)

Add it behind the cluster, mirror and resized to 80%.
Duplicate it and move one below the frame, then use the Eraser Tool to remove access on both skirts
for the color adjustment I've used the same sharpening as above, 
then duplicate both tube layers, and on both changed blend mode to Overlay and Opacity to 69.

Drop shadows:
On the frame and cluster -1, 4, 40, 4.
On the girl 1, -2, 40, 4.

Add proper ©
and my name was made with BickhamScriptFancy2, color #0c1804, with a subtle glow using 
Alien Skin Impact - Gradient Glow, color #c57f0e. 

CLose the white background and save as a PNG

And you're done

Hope you've had fun.


10 May 2010

Safe City


Tutorial is made in PSP10 

Supplies

Download my template HERE

Licensed artist work is by Elias Chatzoudis

Font used is FestivalFlourish


Let's start


Open the safe city template.
Pick your tube of choice and place it in front of the tag. 

Add 3 parts of the same tube in the 3 frames. 

(If you don't know how to do it ; use the magic 
wand to select one of the frame backgrounds on BG3, add your tube of choice above and use
the move tool to move it to your liking, then rightclick and choose Promote Selection
to Layer, deselect. then you see you still have the whole tube to use to do the same 
in the next 2 frames)

Change color on BG3 to compliment your tubes if you like, I kept mine black ;)

Merge down together the 3 tube layers, duplicate, on the original add Effects - texture effects -
Blinds: Width 2, Opacity 15, Color: Black, Horizontal checked.
On the Duplicated one, change blend mode to hard light (Or play with it to your liking)

Go to BG1 select all, float, defloat. Use Gradient foreground/background
Linear Style, Repeats 1, pick black as foreground color and a color from your tube 
as background color. add a new raster layer and flood fill, deselect and close the original behind.
(I always add a new layer and keep the original in case of mishaps ;)

Add the same Gradient on BG2 and 3frames too

On the LIGHTS layer add noise ; uniform, 100, monochrome.

Duplicate BG2, on the top one sleect, float, defloat, and add Effects-Texture effects-
Mosaic-Antique at 100, 100, 50, 5, 5, deselect.

Give this Inner bevel to the 3frames layer:
Bevel 2, width 31, smoothness 16, depth 16, ambience -15, shininess 6, angle 315,
intencity 35, elevation 71.

Drop shadow used is 1,2,50,4, I used it on BG1, BG2, 3frames,
and the tube in front.

Add proper © and your name of choice, I gave it a tiny white glow, like the wordart ;)


Close the white background, crop - merged opaque and save as PNG


And you're done

Hope you've had fun.

17 Apr 2010

Rainbow Fling


Tutorial is made in PSP10


Made this tag a while back to show off my Rainbow Fling kit
didn't think of tuting it, but someone asked where the tut was, 
so I desided to write it out, and added a wordart behind this time, so
here it is ;))) Have fun!!


Supplies 


My Rainbow Fling kit HERE

Mask 82 HERE

Just rightclick and save the wordart ;)


Licensed artist work is by Elias Chatzoudis


Font is called Penshurst you find it HERE


Let's start

Open a new image 600 x 600 flood fill white.
Add the Rainbow Fling wordart.
Open paper 15, copy and close it again, add a new raster layer, select all and 
paste into selection, deselect and add DBV mask 82 to it, merge group.
Add element 5, resize 70%, Image - Flip and move it to the right.
Add Frame 10 resized 60%. Use the magic wand to select inside the frame, add a new 
raster layer below. Open paper 14, copy and close again, paste into selection, deselect.
open the rainbow (element 50), resize 40% and move it up a little.
Add your tube of choice on top.
Add a bow (element 15), resize 60%, move it up to the left.
Add the button heart (element 13), resize 50%, Image - Free Rotate; Left, 30.
Move it to the left, duplicate and mirror.
Add the 4 flowers (elements 23, 24, 54, 55), resize them 50%
Add the cup (element 61) resize 35%
Sharpen things that look blury and give drop shadows, I've used 2, -3, 30, 4.
Add your name using Penshurst font, give it a double gradient glow using Alien Skin
Eye Candy 5 - Impact, drag your name layer under the tube like she's sitting on it ;)

And you're done

Close the white background, crop (Use the snap crop button Merged Opaque)
then File - Export - PNG Optimizer.

Hope you've had fun.

27 Mar 2010

Fairy Star


Tutorial is made in PSP10 

Supplies

My clusterframe and wordart HERE

Sending special thanx to Gunhild Storeide for use of 2 CU bows
and to Delicious Scraps for use of CU metal leafs

Licensed artist work is by  Suzanne Woolcott

Plugin used

Penta.com - Jeans

Font used on my name is Valentina JF


This is a short one ;)

Let's start

Open a new image 600 x 600 flood fill white for now.
Add the frame.
Duplicate it and on the original blur - gaussian blur 10
and add Penta.com - jeans at default settings and mirror it.
Duplicate it and change blend mode to Multiply.
Add the wordart.

On your top frame, use the magic wand to select inside.
Selections - modify - expand 10. Add a new raster under it and 
flood fill with a color to compliment the frame. Deselect, then 
go to Effects - Texture Effects - Blinds: 3, 5, black, Horizontal.

Add all the tubes you'd like in the frame and around, and give them 
subtle drop shadows, I used 1, 2, 30, 3, black.

Add your name and don't forget the proper © 

Close the white background, crop it (hit the Merged Opaque button)
And save it as a png.


And you're done

Hope you've had fun.


20 Mar 2010

Creative Addictions Forever


Tutorial is made in PSP10 

Supplies needed

My Supplies including template and paper HERE

Mask 97 HERE


Licensed artist work is by Elias Chatzoudis

Plugins used

Penta.com - Jeans
Alien Skin Eye Candy - Impact 

Font used P22 Corinthia


Let's start


Open the template, and remove my top layer.

If you're using the same tube as me, just add it and drag it 
down below the "Creative" layer and adjust it to fit the words.
Go to the purple circle, select all, float, defloat.
Add the tube you want and adjust it with the move tool to fit 
in the circle, when you're happy rightclick on the layer and promote selection to 
layer, deselect and delete the original tube layer below.
I canged the blend mode for the tube to Screen.
On the circle add Penta.com - jeans - amount 62, border width 4.

Add the included paper above the background and load my mask nr 97 on it
I've also used the paper as background in all 3 frames, add the paper in front of 
one of the paper layers, resize 60 % and rotate
it with the pick tool to fit in the frame, select the background layer in the frame
select all, float, defloat, then on your resized paper layer, rightclick and 
chose promote selection to layer, deselect. Delete the original, duplicate and mirror
the paper layer to fit in the opposite frame/s.

In the frames I've decorated with tags I've made before by the same artist, they're 
resized to 15%. 

On your 3 black frames use the manual color correction tool to give them colors from your tube.
Add inner bevel to the frames with these settings


Give the circle wordart and the outer circle a gradient glow
I've used Alien Skin Eye Candy - Impact - Gradient Glow with these settings


Give the frames, the circle wordart and the circles a drop shadow, 0, 0, 40, 6, black.

Remember the proper © and I've used the font P22 Corinthia for my name, and gave it the same Glow .


And you're done

Hope you've had fun.

5 Feb 2010

The More


This tutorial is written by me using PSP10
Any similarities to other tutorials are purely coincidental
and unintentional.
All materials are © to their respective owners.
Tube is by Tiffany Toland at UpYourArt, you gotta buy it to use it ;)
Kit is my own Romancing the Heart download it here
I saved my decor as a cluster for you in png, got carried away adding
stuff, so I'm not even beginning to write it out, lol, so instead
just rightclick and save ;)

Font for my name is called Carlotta.
I've also used Flaming Pear Glare for the tube and
Alien Skin's Eye Candy 5: Impact - Gradient glow on my name, but it's not a must ;)

Let's start
Open a new image 600x600, flood fill white

Add element 1 (the long wordart), resize 80%, Select all, float, defloat.
add paper 6 above, rightclick on it and chose promote selection to layer (or hit Ctrl+Shift+P)

Select none (Ctrl+D) then just delete the black wordart and the paper layer.
Add element 30 resize 65 %. move it to your liking after you add the frame.
Add element 20, resize 75%.

Add the heart frame (element 27), resize 50% and rotate 15 % to the right, sharpen.

Use the magic wand, select inside the white frame, selections - modify - expand 5

Add a new raster below the frame, copy paper nr 2 and paste into selection.
Add your image of choise above, move and resize to fit, Selection - Invert and delete
the access, deselect.
I gave my tube a glare, using Flaming Pear at these settings


If it doesn't sute your tube, try hitting the dice button to test other
settings, that's how I ended on the one I used ;)

Add element 11, resize 55% drag it to the top of the frame, give it a drop
shadow 1, 1, 40, 4. Also added the same drop shadow to the frame.
Add the decor cluster, and move it to your liking,
then add your name !!
I gave mine a tiny glow using Alien Skin's Gradient Glow.
Close the white background, crop the tag and save the tag as
a png.
And you're done :))
Hope you've had fun!!

Tutorials are © Tutorials by Vaybs

9 Sept 2009

Too HOT to be Innocent


This tutrial is written by me using PSP 10
Any similarities to other tutorials is purely coincidental and unintentional.
All materials used are copyright to their respective owners.

Supplies

My NSIT kit here
The wordard is png so just rightclick and save ;)


I'm using the artwork of © Michael Landefeld
To use it you gotta purchase a license through Cilm here
Plugin used; Alien Skin Eye Candy 5: Impact
Font used; AmoreATT

Let's start

Open a new image 600x600 flood fill white
Add your frame of choise, I've used nr 1, resize 85%
Use your magic want to select inside, Selections - moderate -
expand by 5. Then add a new raster layer below the frame and flood fill
with the lightest grey, #c0c0c0.
Add the chickenwire below the framebackground and recolor it
later with the Manual Color Correction to fit your tag
(I picked red from the chair ;)
Now add the Bars (element 57) below the frame resize 60%
and remoce the access outsie the frame.
Then add a chair and the clock and whatever more you want
inside the jailcell ;) and someone to sit on the chair.
Resize all the elements to your need, use the pick tool (K) to shrink it ;)
Now to give the jailcell a little more shabby look,
use the Lighten/Darken Brush tool 

Keep the right mouse button down to color it lighter and switch to the left
to color it darker, just play with it, I made the floor lighter and the
walls shabby and darker.
now to decorate ouside the frame I've used elements
37, 41, 58, 68, 69
Resize, rotate, duplicate and mirror to your liking ;)
Add the wordart, mine's resized 80% and given a subtle white glow.
Remember proper © ;)
oh, and add some drop shadows, lol forgot to mention them this time.
Close the white background and export as png.
And you're done :))
Hope you've had fun!!And congratulations on a new tag :))

Tutorials are © Tutorials by Vaybs

15 Jun 2009

A Day in the Garden


This tutrial is written by me using PSP 10
Any similarities to other tutorials is purely coincidental and unintentional.
All materials used are copyright to their respective owners.

Supplies
A day in the garden tag sized kit here
The clouds are here

Licensed artist work is by  Pinuptoons

Font of choise, I've used BeautySchoolDropout

Let's start

(First, if you're using the full size edition of the kit for this tut
then the element numbers won't match ;)

Open a new image 600x600 flood fill white.Add frame 8, resize it 80%
I've also changed the color of it a bit.(I used the Manual color correction,
Source: #566822 , Target: #5ba51e) give it a drop shadow -2,3,50,4.
Add paper1 resize it to your liking, then use the selection tool on rectangle,
select inside the frame, selections - invert, then hit delete to remove access paper.
I tweaked the colors of the paper with the same settings as the frame.
Add element 29 behind the paper layer, resize it 70% and drag it up to the right.
duplicate it and drag one down on the left.Add element 11 and drag it to the right.
Now we start adding our scene on top off the paper layer
I started with element 21 (the flowerbed), resize it 50%
and place it so that some flowers are behind the frame on the left.
Duplicate and mirror, merge down, and give it a drop shadow 2,-4,40,4
then duplicate again and move this layer above the frame layer,
then we get the flowers behind the frame out in the open
Then use your eraser to remove the grass on the bottom of the frame.
Now I'm sorry but I didn't put notes on the rest of the layers to tell
how much I've resized each element,
but I'm listing all the elements I've used behind the bed of flowers;
Element 30, 14, 5, 1 (the bench), 35, 28, 03, 13, the clouds, and 26.
On the outside of the frame I've used 34, 36 and 16.
Resize and ajust them to fit the tube('s) you're using for it.
Give everything a drop shadow and remember proper ©
Crop it if needed, close the backgroundlayer
and save it as a png.
And you're done :))
If you have any questions don't be affraid to ask them ;)
Tutorials are © Tutorials by Vaybs

12 Oct 2008

Manual color correction tool

I don't know why PSP have decided to keep this awesome tool
so well hidden and not out on the table where it belongs.
It's the tool to use when you want to change elements to whichever colour you might need.

Basically, its the tool you never knew you needed but absolutely love when you find it, and will wonder how you ever managed without it. 

This is the button I'm talking about 


If you don't have the Manual Color Correction button visible :-

On your toolbar go to View - Customize
On the Commands tab choose All Commands 
Scroll down the list of tools in the box & find the Manual Color Correction button


For easy use you can place into your toolbar, to do this:

With the box visible, as the previous screenshot,
Click on the icon with your mouse and holding it down, you can drag it out and place it where you like in your toolbar. 

This is where I've got mine


Now you know where it is, to use it just highlight the layer of the
element you want to colour change and click on the icon you've just placed
into your toolbar 

then you get this box


In this example I've used a greyscaled butterfly to show you 
I've had it in Effects - Photo Effects - Black and white film first 
(play around with the filter color and see what looks best there)

If the element has just one colour you don't need to greyscale it, 
but often when it has 2 or more colors you might struggle to get a colour you 
want without greyscaling it first.
On the image above you see I've picked a dark grey from the butterfly
and chose a green as Target colour.
(just rightclick on the butterfly to the left, the before shot, to pick source colour, 
play around with it, and you see the different results you get on the right, 
it's real fun )
If you have the tag you're working on beside the window
you can just click on a colour from your tag to pick it for your element.
When you find the colour you want to use, just click on the image to fix it into the source box and OK it.
Can't believe it took 3 years before I came over someone mentioning this
button, now I can't live without it !
Anything else you wonder about, just ask .


Visits since Nov 24.2009

free counters