Welcome to Tutorials by Vaybs
Here you find all my tag tutorials using Paint Shop Pro (I use PSPX) and Animation Shop 3.
They're all made with FTU elements ;) And if I'm doing my job right you might pick up a few new ideas and tricks on the way.
All links open in a new window;)
Layout tag is made with my Betsys Paradise Dream kit ;)
Have fun!!
Showing posts with label Forum Set tutorials. Show all posts

14 Jul 2012

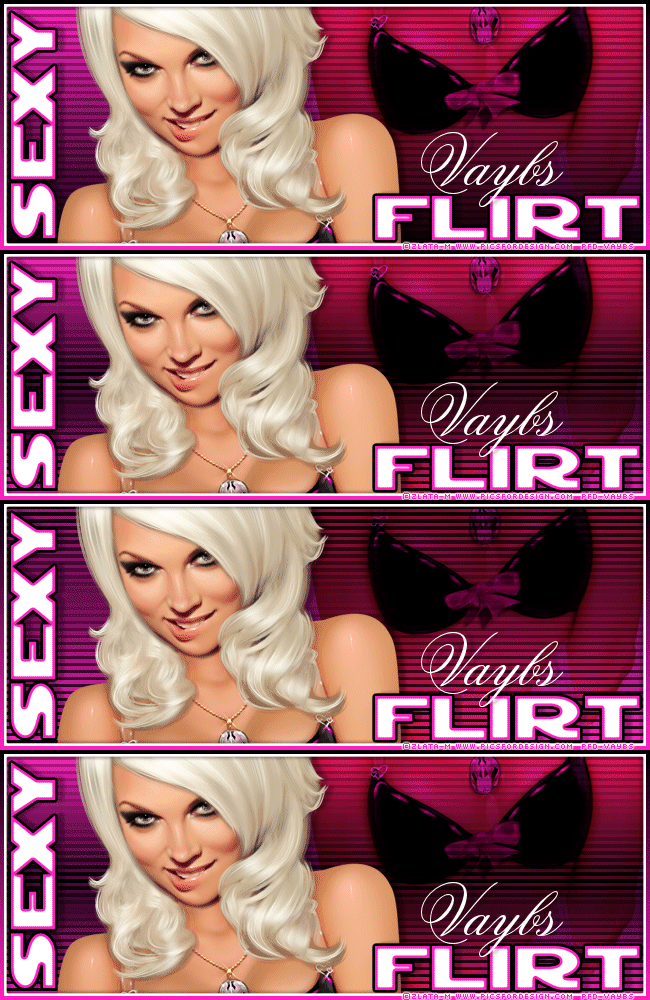
Sexy Flirt


Tutorial made in PSP10 and Animation Shop 3


Supplies

My supplies 
HERE


Licensed artist work is by Zlata_M 


Plugins used; 

Alien skin Eye candy 5, Impact - gradient glow
Italian Editors Effect - Effetto Tv (included in the supplie

Fonts used are RedFive
and Grand Prix ES


Let's start


Open a new image 650x250.
Make a foreground/background gradient, Linear style, 0, 0, make it black on the bottom 
and #ff24c2 (pink) on the top, flood fill it.
Duplicate it twice and flip one of the layers so the black is on top.
Add a new raster layer between the 2 duplicates and change the gradients Repeats: to 1 (we want the 
black to go in the middle with pink on both sides), flood fill the new layer. 

Add Italian Editors Effect - Effetto Tv with these settings to the 3 of them.


(I've got mine in my filters unlimited filters to work)

Close 2 of the layers before moving on.

Add your tube of choice, duplicated it, move the first one to the left and get the face in center
move the other one to the right and center the brah on the upper right side, change blend mode
to Multiply on this one (or maybe something else looks better for your choice of tube). 

Make the frame by adding a new raster layer on top, 
Selections - select all
Selections - modify - contract 4
Selections - invert, switch your gradients Repeats: back to 0, and make sure you have black on top,
then flood fill and deselect.
Give it a white glow using the "Vaybs Nice White" gradient glow I gave you in the supplies 
(add it to your Alien skin Eye candy 5, Impact, settings, glow folder first)
Add a drop shadow to the frame -2, 2, 30, 4, black and shadow on new layer, then duplicate the layer,
mirror and flip it.

Use the font RedFive, color white, size 72, type out "SEXY", convert to raster layer.
Image - free rotate, rotate left 90 degrees and move it to the outer left side.
Type out "FLIRT", convert to raster layer and move it down to the right.

To both the words you're adding Alien skin Eye candy 5 - Impact - Gradient Glow, 
use my "Vaybs Nice White" but go to the Basic sheet and change Glow Type: to Inside Glow, 
then go down and change the white color box to our hot pink #ff24c2.

Then use the same Glow again on both words, but this time change it back to Outside Glow
and change the color to black.

for my name I've used the font Grand Prix ES, color white, size 72, and placedd it
above "FLIRT" (Then it goes just below the brah on my tag)

Drop Shadow I've used on my tube, "Sexy Flirt" and names is -1, 7, 30, 40.

As you can se in the supplies I've already made you the frame for the avatar, to make the 
job easyer for you, and noone can say the didn't bother to make it, I just copied the finished banner into it,
resized it 80% and moved the face to my liking.
add proper © (name of artist and your license nr) add your name and save it as a jpeg.

Then we're ready to animate the banner, just remember proper © 

Open Animation Shop 3.

Make sure only one of the lined backgrounds are open on your tag, 
start with the black at the bottom one, copy merged and paste as new animation in Ani Shop3. 

Close the lined layer you've used and open the one with black in the middle, copy merged again
and paste after current in Ani shop, we want 2 of this one so paste it after current once more.

Back in PSP close the lined layer and open the one with black on top, copy merged and paste 
before current layer this time around. Then we've got 4 frames with black on the bottom, middle,
top and middle again ;) 
now select all (ctrl+A) change frame properties to 30 and view animation.

If you're happy with it add all the names you like.

view Animation and save as...


And you're done

Hope you've had fun.

Would love to see your results so you're more than welcome to add them below.

4 Jun 2012

Black'n'White forum set


Tutorial is made in PSP10 and Animation Shop 3

Supplies


My supplies HERE
(these are my elements, not to be used for other tuts)

Artwork used is a Verymany exclusive from PFD

Plugins used;
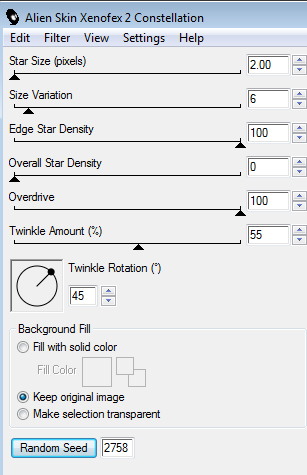
Alien skin Xenofex 2 - constellation

font used is Oxida, you find it HERE


Let's start


Open the "vaybstutbackground",selections - select all, 
selections - modify - contract 5,
selections - invert,
add a new raster layer and flood fill #c0c0c0,
selections - modify - contract 1
add a new raster layer and flood fill black
deselect
On the light grey frame; Adjust - Add noise, Random, 80, monochrome.
Add leafs 1, 2 and 3, doodle, rose1, locket and rose2
move them all to the left side and arrange them like 
shown below


When you're happy with them, duplicate all elements and mirror them.
Add a closeup of your tube of choice in the middle, effects - photo effects - 
black and white film, chose the filter color that suits your tube best, strength 100.
Merge down the 2 big roses so they share a layer, duplicate it twice and add
Alien skin Xenofex 2 - constellation with these settings to all 3 layers.
(Remember to hit the random seed button to the other 2 layers)


Do the same to the 2 small roses as you did to the big ones.
Add proper ©
My name is down on the right, typed with the font Oxida, size 48, color #c0c0c0.

Ready to animate?

Close 2 of each of the rose layers, copy merged (Ctrl+Shift+C)
open animation shop3
Paste as new animation 

back in PSP open the next rose layers, closing the ones you've used
copy merged again and paste after current in ani shop3
do the same with the last rose layers too.

you now have 3 frames in ani shop3
view animation and save as...

To make an easy avatar for it open a new image 150x150
selections - select all 
selections - modify - contract 5,
selections - invert,
add a new raster layer and flood fill #c0c0c0,
selections - modify - contract 1
add a new raster layer and flood fill black
deselect.

Copy merged the banner and paste as a new layer below the frame.
Resize 80-75% depending on the size of your tube and fit it to your liking in 
the little avatar.
Remember proper © and i've only used my first letter V, size 36 on this one.
Save as jpeg.


And you're done

Hope you've had fun.

22 Apr 2012

Night Life


Tutorial is made in PSP10 and Animation Shop 3


Supplies


Just rightclick and save these 2 wordarts


I'm using the artwork of The Hunter, previously available at PTE, 
now set up his own shop HERE


Plugins used

Alien skin Xenofex 2 - Constellation
Mura's Meister - Copies

font used is Sloop and BankGothic BT


Let's start


Open a new image 650x250, flood fill #280c66.
Add the Nightlife WA, duplicate it 3 times.
On the original add drop shadow 6,7,60,8,black, shadow on new layer.
Then add constellation to all the 4 WA layers with the settings below, 
just remember to hit the random seed button for 3 of them ;)


close 3 of the layers.

Add a closeup of the tube you wanna use below the nightlife wordart
place it to your liking.
Duplicate it and on the original add Mura's Meister, Copies, wall Paper(rotate)
Change blend mode to Saturation (Legacy) merge down on the background layer.
Crop, to remove access of the tube that we don't see but is still there.
On the copy of the tube change Blend Mode to Soft Light.

To make the frame add a new raster layer on top, selection, select all.
Selections, modify, contract 6.
Selections, invert, and flood fill #270c62, deselect. 
Duplicate it 3 times and on all 4 add the same
constellation as above (don't forget about the random seed button)
close 3 of the layers.

Add a new raster layer on top, selection, select all.
Selections, modify, contract 4.
Selections, invert, and flood fill black, deselect.

Use the font Sloop, color white, type "I love the" size 72,
give it a drop shadow -1, 4, 40, 2, black. I've placed mine on the top left side.

Use the same font and drop shadow for your name, I've placed mine on 
the bottom right side.

Remember to add the proper ©.

then we're ready to animate (well i close my name layer so i can add all the 
names I'd like to it in ani shop)

Copy merged
Paste as new animation in ani shop 3
back in PSP close the nightlife wa layer and frame layer you've used and open the next 2
copy merged again and paste after current in ani shop.
Do the same with the next 2 layers in PSP.

So in all you've got 4 frames in ani shop when you're done.
View animation, and if you're happy with it add all the names you'd like to it and 
save as... Optimized octree looked good for my saving.

Moving on to the Avatar

Open a new image 150x150, flood fill #280c66.
Add the tube closeup from your banner with blend mode soft light.
Add the Life WA, move it a little down, adjust is as you move along ;)
duplicate it 3 times and add the same constellation as above.
Link all the 4 life WA layers together so you're able to move it later on
if you wanna adjust the placing of it.
Look at the image below to see how, if you don't know.


click on the Layer Link toggle button so it sais 1 on all 4 Life WA layers
then they're all chained together, so if you move one of them, the other 3 will move with it.

To make the frame:
Add a new raster layer on top, selection, select all.
Selections, modify, contract 4.
Selections, invert, and flood fill white, deselect.

Add a new raster layer on top, selection, select all.
Selections, modify, contract 3.
Selections, invert, and flood fill black, deselect.

Use the Sloop font, color white, type "Night", size 48place it upper left on the avatar.
give it a drop shadow -1, 4, 40, 2, black.
Use the BankGothic BT font to type your name in white, size 30, place it below the Life WA

this is where you wanna adjust things and get them to your liking,
don't forget to add the proper © too.

When you're happy with it, it's time to animate, but you know how that's done
above now so I don't have to tell you how ;)


And you're done

Hope you've had fun.

20 Nov 2011

Winter Wonderland Forum Set


Tutorial is made in PSP10 and Animation Shop 3


Supplies

My old Winter Wonderland kit HERE

and my supplies HERE

(Add the 2 Alien skin filter settings to your installed folder 
alien skin - eye candy5 nature - settings- snowdrift folder.)

I've used licenced artwork by Zlata M, available at PFD


Plugins used;

Alien skin eye candy5 Nature
Alien skin eye candy5 Impact

Font used is Snowgoose and Bank Gothic on the avatar.


Let's start


Open a new image 650 x 250 flood fill white.
Add your closeup of choice and place her to the far right.
Add paper3 below and move it to the left so it covers the white.
Add nameplate2, reize to 70%, place it top center, Adjust - Sharpness - Sharpen.

Add the 2 trees, resize one 65% the other 60%, place them together on the left,
Adjust - Sharpness - Sharpen.
Then add Alien skin eye candy5: nature - Snow Drift - under settings find: Snowdrift1Vaybs
Add it to both trees.

Add snowornament2 move it behind the nameplate2 (so it's just sticking out above and below), 
duplicate it and resize 65% move that one behind the top of the left tree, sharpen.


To make the frame:
Add a new raster layer on top Selections - Select all, 
Selections - Modify - Contract 7
Selections - Invert
Flood fill tool - make a gradient - foreground/background, angle 45, repeats 5, linear style.
pick a dark and a light blue from your tag and flood fill, deselect.
Adjust - Add Noise, random 70.
Effects - 3D effects - inner bevel with these settings


Duplicate the frame, then on the top one
add Alien skin eye candy5: nature - Snow Drift - under settings find: Snowdrift2Vaybs
(If you don't get the supplied settings to work, here are the numbers ; 
Basic: 25.17, 71, 40, 100, 0, 0
Lighting: 145, 15, #118ccf) 

Use the selection tool on rectangle and select the top of the frame, then delete (we don't 
want the snow on top, just at the bottom)
merge the 2 frames down on eachother.
Duplicate it and on the bottom one add Adjust - Blur - Gaussian Blur - Radius 3.

Give a drop shadow to the elements, I've used settings 2,-2, 30, 5, black.

Crop the banner to remove the access we don't see.

Remember to add proper ©

Merge down all the layers below the closeup, copy and paste as new animation
in Ani shop 3, then paste after current until you've got 10 frames.

Open the snow animation from the supplies, select all, copy.
Then on the banner hit Ctrl+E to see the snow, place it
and view animation to see if it turned out right, if not just undo, and try again.

Back in PSP, close the backgroundlayer you've already used and copy merged the rest of the tag
paste as new animation in Ani shop and then paste after current until you've got 10 frames.
Select all and copy, redo Ctrl+E on the banner and place the frame correctly, if you misplace it 
just undo and try again.

Back in PSP add your name using the font Snowgoose, I made it with the same gradient as on the frame
gave it the same Noise and Inner Bevel then a white glow 
using Alien Skin eye candy5: Impact - Gradient Glow. Give it a drop shadow same as before, but change
it to -2,2.
Copy it and add it the same way as you did with the frame and snow ;)

To make the avatar, open a new image 150 x 150, make the same frame as you did with the banner
only difference I did was, Selections - Modify - Contract 5. copy merged the banner and 
add to the avatar, resize 80% and move the closeup visible in the avatar. 
Add proper © and save it as a jpeg.

And you're done

Hope you've had fun.

4 Aug 2011

Independent Woman


Tutorial is made in PSP10 and Animation Shop 3

Supplies

From Jessica her FTU kit "Independent Woman" HERE
Thank you so much for sharing hunni!!!

From Missy, her animation "circlesparks" HERE
Thank you so much for sharing hunni, you rock the animations!!

Artwork by Barbara Jensen who has her own site HERE
but this tube is an exclusive made for Scraps and the City, 
you find it HERE

Plugins used
Alien Skin Xenofex 2 - Constellation
Alien Skin Eye Candy 5 - Impact - Gradient Glow
You can download my glow settings HERE and add it to your
Alien skin Impact folder under settings - glow.
Font used for my name is BankGothic BT


Let's start

Open a new image 650 x 250, add paper4.
Add WAMask, resize to 40%, move it to the left, duplicate it
and move one to the right.

Add Envelope, resize 40%, move it out on the lower left corner.

Add the WordArt, resize 65%, change blend mode to
Luminance (legacy).
Duplicate it 2 times, and add Constellation to all 3 with these
settings (remember to hit the Random seed
button for nr 2 and 3)

Close 2 of the wordart layers .
Add your tube of choice, move it to the left, duplicate it and move
it below the wordart layers, move it to your liking and change
blend mode to Luminance (legacy) (or maybe another blend mode
fits your tube better, play around with it;)

Add Key2, resize 20%, free rotate right by 35 and mirror it,
 move it to the right.
Add the Leaves1, resize 40% and mirror, move it to the right
to your liking. As you can see I've also duplicated it
and moved some to the left behind the tube ;)

Crop the tag now to remove all access.
(Just hit the Merged Opaque button to get the whole tag)

Time to make the frame.
Add a new raster layer on top,
Select All, Selections - Modify - Contract 7.
Selections - Invert , flood fill selection with Black.
Selections - Modify - Contract 1, add a new raster layer,
flood fill it a red from the background paper, I've used  #860001.
Deselect.
Duplicate the black frame 2 times, and add constellations with
these settings to all 3 (remember the random seed button)

On the red frame, duplicate it twice
on all 3 add
Adjust - Add /Remove Noise - Add Noise
Random 70, 72 and 74 (monochrome checked)
Close 2 of each frame.

Add proper © and then we're ready to animate ;)

Copy merged (ctrl+shift+C)

Paste as new animation in Ani Shop

Back in PSP close the 2 frame layers and the wordart layer you've used
and open the next ones.
Copy merged again and paste after current in ani shop.
Do the same to the last set of frames and wordart too.

Now you have 3 frames in ani shop.
open the circlesparks animation, and you'll see it has 15 frames
so we need 15 frames in our banner too.
select all and copy the banner, go to the 3rd frame and paste after
current, then you have 6, go to the 6th and paste after current.
then you have 9, do it 2 more times to get to 15 ;)

Now you have 15 frames, select all and keep frame 1 visible
go to the circlesparks select all and drag it over to the banner,
then you'll see it and can place it where you like.
if you mess up or don't like your placing, just undo (ctrl+Z)
and try it again ;)

That's it :)))
Add all the names you like
I've used Bank gothic bt on mine, same color as the red frame
and with a white glow from alien skin's gradient glow.
(If you're using my glow settings it's the Vaybs Nice White.)

The avatar is made with a new image 150 x 150
copy merged your banner and add it.
make the same frame as on the banner, and add the
proper ©

That was it, think i've covered it all now, if not just drop me
a line ;)

Tutorial is © Tutorials by Vaybs

3 Aug 2011

Hot Music


Tutorial is made in PSP10 and Animation Shop 3


Supplies 

My supplies HERE

And from Missy, we're using her "hitman" animation HERE

I've used the licenced artwork of Arthur Crowe, currently available at PTE

Plugins used;
Mura's meister - Copies
Toadies - what are you? HERE

Font used is BankGothic BT

This is a heavy animation challenge so fill your teacup and keep your cool.


Let's start

Open a new image 650x250 
Pick your tube of choice and add it to the left in the banner. 
Pick matching foreground and background colors from your tube, click on the background
color and chose 
Gradient, foreground-background, Repeats 7, Style: Sunburst, Horizontal: 60, Vertical: 50.

Flood fill your background layer. Duplicate it and on the top one:
Effects - Edge Effects - Enhance More
Effects - Edge Effects - Enhance More (yes twice ;)
Effects - Edge Effects - Enhance 
Adjust - Blur - Gaussian Blur - 1
And change blend mode to Hard Light.

Duplicate your tube and on the original add
Effects - Mura's meister - Copies - *Line - just change Number to 4, rest as default.
Change blend mode to Screen and lower opacity to 30.

(All blend modes and opacity settings are for you to play with, 
cos they'll work differently on other tubes)

Add my linetemplate, select it. (Ctrl+a, ctrl+f, ctrl+shift+f)
add a new raster layer above and use your same gradient, just change it to Linear linestyle
and Repeats 1, flood fill, deselect (ctrl+d) and delete the black line.

Duplicate your line 7 times, and name them; 35, 70, 105, 140, 175, 210, 245, from the bottom up
on the 35 one add Toadies - what are you? - Overdose - 35.
on the 70 one add Toadies - what are you? - Overdose - 70.
and so on... all the way yo overdose 245.
Close all the numbered layers when you're done.

Add my hot music wordart or make your own, I've used BankGothic BT.
Change color to what fits your tag, mine's white.

Add a drop shadow to your tube, I've used -2, 2, 30, 5, black.

Move to your top layer and let's make the frame;

Add a new raster layer, select all 
Selections - Modify - Contract 2, Selections - Invert, flood fill with one of the colors
you picked from your tube.

Add a new raster layer below it, select all 
Selections - Modify - Contract 5, Selections - Invert, flood fill with the other color
you picked, Adjust - Add noise - Random, 70, monochrome checked.

Add a new raster layer below it, select all 
Selections - Modify - Contract 8, Selections - Invert, flood fill with a 3rd color
from your tube. deselect and give it a drop shadow same as above, only this time I've 
checked the box for Shadow on new layer, then duplicate the drop shadow, mirror and flip it.

Add proper ©, then we're ready to start all the animation.

save your work before moving on in case you clutter it up ;)
and also crop it (to remove the access of the tube or you'll get it with you
when we start copying merged ;)

Ready?

Close all the layers from the top and all the way down to the wordart, 
we want the wordart and the rest visible, (not the already closed layers)

Copy merged (ctrl+shift+C)

paste as new animation in Animation Shop 3

Open your 35 layer, copy merged and paste after current in Ani Shop.
Close the 35 layer and open the 70 layer, copy merged and paste after current in Ani Shop.
Keep going til you've added all, then you'll have 8 frames.

Now select the middle 6 frames, hold down the ctrl key and click on the middle 6 frames.
Copy, then click on the 8th frame and paste after current, Animation - Reverse frames. 
Now you should have 14 frames and if you look at it you've got lines going up and down again
from the middle.

Time to add the next animation.

Select all on your banner and make sure you're seeing the first frame.

Open Missy's hitman animation, select all and drag it over to the banner.
place it in the middle of the gradient circle, right on top of the word music.
view animation to see that you've gotten it right before moving on. 
If not then just undo (ctrl+Z) and try it again.

Time to add the tube and frame to the banner.

Back in PSP close all visible layers and open the layers above the wordart.
Copy merged and paste as new animation in ani shop.
Paste after current til you've got 14 frames.
Select all and copy, on your banner, hit ctrl+E to see the frame and make sure you place it right.
Just undo and try again if you miss it a bit.

Now add your name and others :)
I've used BankGothic Md BT, white , size 48. and placed mine on the wordart line
to the right.
If you're new to this;
Type it in PSP, copy, paste as new animation, paste after current to 14 frames.
Select all and copy, on your banner, hit ctrl+E and put it where you like.

If you wanna save it to be able to add more names later,
File - save as ... Chose filetype .mng. Make sure you don't have a name 
on it when you save :)

Avatar

Open a new image 150x150 add 3 raster layers and make the same frame as above, just duplicate the 
middle one 2 times and add the noise on all 3 to animate it 70, 72 and 74.
copy merged on your banner and paste into it, then move her face where you like it.
I think you know what to do onwards to animate the 3 noise layers ;)
and don't forget © on it.


And you're done

Hope you've had fun.

23 Jul 2011

Beasts in the Wild


Tutorial is made in PSP10 and Animation Shop 3


Supplies


My supplies HERE


I'm using the artwork of Amberly Berendson


Plugins used 

Eye Candy 4000 HSB Noise
and Gradient Glow

Font used on my name is called KolkerBrush


Let's start


Open a new image 650 x 250 flood fill with color #3c5723
Duplicate the background layer 3 times and on all 4 add
Add Eye Candy 4000 - HSB Noise with these settings


Just hit the random seed button on nr 2, 3 and 4. 

Add a new raster layer above, select all, Selections - Modify - Contract 6
Selections - Invert and flood fill with color #8cb366, deselect.
Add HSB Noise with these settings


and give it a subtle gradient glow, I picked a blue one from the butterfly.

Add the bitwelement and the butterfly.
Arrange them to your liking ;)

Now find a fitting tube, 
I've used a closeup and moved it to the left.
Give it a drop shadow, I've used -2, 7, 50, 3, 

Add the wordart down on the right, and recolor it to fit your tag. 
Remember the proper ©

Add your name of choice (I always prepare the animation first and add names in Ani Shop)

If you're happy with it then you're ready to animate ;)

Copy Merged (CTRL+SHIFT+C)

Paste in Ani Shop

Close the background layer you've used and copy merged again.

Paste after current in Ani Shop
do the same to the next 2 background layers, so you now have 4 frames 
in Ani Shop.
Select all and change Frame Properties to 25. 
View Animation and save if happy with your result !! 

An avatar is optional but here's what I did to make mine
Open a new image 150 x 150 select all, Selections - Modify - Contract 5
Selections - Invert and flood fill with color #8cb366 
Deselect.

Add the closeup of your tube you used and move it to the spot you wanna use.
If you need a background you can use one from the banner, I didn't need any.

Duplicate the frame layer 3 times and on all 4 add
Add Eye Candy 4000 - HSB Noise same as on the background above, remember to hit the random 
seed button on the other 3 ;)
Close the bottom 3 frame layers.
Add the proper ©

Then you're ready yo animate the avatar.
Copy Merged (CTRL+SHIFT+C)

Paste in Ani Shop

Close the frame layer you've used, open the next one and copy merged again.

Paste after current in Ani Shop
do the same to the next 2 frame layers, so you now have 4 frames 
in Ani Shop.

view animation

add names and save your tags!!


And you're done

Hope you've had fun.

Visits since Nov 24.2009

free counters