Supplies
From Jessica her FTU kit "Independent Woman" HERE
Thank you so much for sharing hunni!!!
From Missy, her animation "circlesparks" HERE
Thank you so much for sharing hunni, you rock the animations!!
Artwork by Barbara Jensen who has her own site HERE
but this tube is an exclusive made for Scraps and the City,
you find it HERE
Plugins used
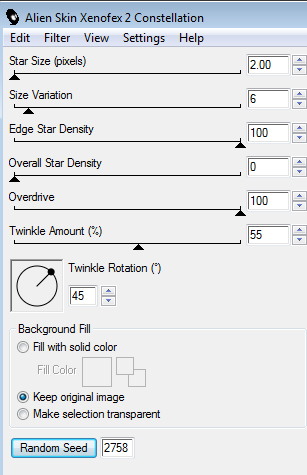
Alien Skin Xenofex 2 - Constellation
Alien Skin Eye Candy 5 - Impact - Gradient Glow
You can download my glow settings HERE and add it to your
Alien skin Impact folder under settings - glow.
Alien Skin Eye Candy 5 - Impact - Gradient Glow
You can download my glow settings HERE and add it to your
Alien skin Impact folder under settings - glow.
Font used for my name is BankGothic BT
Let's start
Open a new image 650 x 250, add paper4.
Add WAMask, resize to 40%, move it to the left, duplicate it
and move one to the right.
Add Envelope, resize 40%, move it out on the lower left corner.
Add the WordArt, resize 65%, change blend mode to
Luminance (legacy).
Duplicate it 2 times, and add Constellation to all 3 with these
settings (remember to hit the Random seed
button for nr 2 and 3)
Close 2 of the wordart layers .
Add your tube of choice, move it to the left, duplicate it and move
it below the wordart layers, move it to your liking and change
blend mode to Luminance (legacy) (or maybe another blend mode
fits your tube better, play around with it;)
Add Key2, resize 20%, free rotate right by 35 and mirror it,
move it to the right.
Add the Leaves1, resize 40% and mirror, move it to the right
to your liking. As you can see I've also duplicated it
and moved some to the left behind the tube ;)
Crop the tag now to remove all access.
(Just hit the Merged Opaque button to get the whole tag)
Time to make the frame.
Add a new raster layer on top,
Select All, Selections - Modify - Contract 7.
Selections - Invert , flood fill selection with Black.
Selections - Modify - Contract 1, add a new raster layer,
flood fill it a red from the background paper, I've used #860001.
Deselect.
Duplicate the black frame 2 times, and add constellations with
these settings to all 3 (remember the random seed button)
On the red frame, duplicate it twice
on all 3 add
Adjust - Add /Remove Noise - Add Noise
Random 70, 72 and 74 (monochrome checked)
Close 2 of each frame.
Add proper © and then we're ready to animate ;)
Copy merged (ctrl+shift+C)
Paste as new animation in Ani Shop
Back in PSP close the 2 frame layers and the wordart layer you've used
and open the next ones.
Copy merged again and paste after current in ani shop.
Do the same to the last set of frames and wordart too.
Now you have 3 frames in ani shop.
open the circlesparks animation, and you'll see it has 15 frames
so we need 15 frames in our banner too.
select all and copy the banner, go to the 3rd frame and paste after
current, then you have 6, go to the 6th and paste after current.
then you have 9, do it 2 more times to get to 15 ;)
Now you have 15 frames, select all and keep frame 1 visible
go to the circlesparks select all and drag it over to the banner,
then you'll see it and can place it where you like.
if you mess up or don't like your placing, just undo (ctrl+Z)
and try it again ;)
That's it :)))
Add all the names you like
I've used Bank gothic bt on mine, same color as the red frame
and with a white glow from alien skin's gradient glow.
(If you're using my glow settings it's the Vaybs Nice White.)
The avatar is made with a new image 150 x 150
copy merged your banner and add it.
make the same frame as on the banner, and add the
proper ©
That was it, think i've covered it all now, if not just drop me
a line ;)
Tutorial is © Tutorials by Vaybs


Question? Can you tell me what WAMask you used in the tutorial, and the link to the mask creator's site so we may download it? Thank you!
ReplyDeleteThere's no mask used in this tut hun.
ReplyDeletethe WAMask in question is one of the elements in the scrapkit ;)
ReplyDeleteVaybs, I can only summarize what I see: Wonderful! kisses ;-))
ReplyDeleteLove it... Thank you soo much..
ReplyDeleteoh shoot i can't find the kit by gothic inspirations
ReplyDelete