

Tutorial is made in PSP10
Supplies
Frame and Time wordart HERE
Yolanda's Steampunked Cluster HERE
I'm using the artwork of [URL=http://www.crisortega.com/]Cris Ortega[/URL] who's an FTU artist
Plugins used
Mura's Meister - Copies
Flaming Pear - Glare
Alien Skin Xenofex 2
Eye Candy 4000 - HSB Noise
Font used is called BickhamScriptFancy2
Let's start
Open a new image 650 x 650, flood fill white.
Add Sapphy's frame, use the selection tool on rectangle to select the text inside
and delete it.
Duplicate the frame and on the original,
add Mura's Meister-Copies - Wall Paper(roate) on default settings.
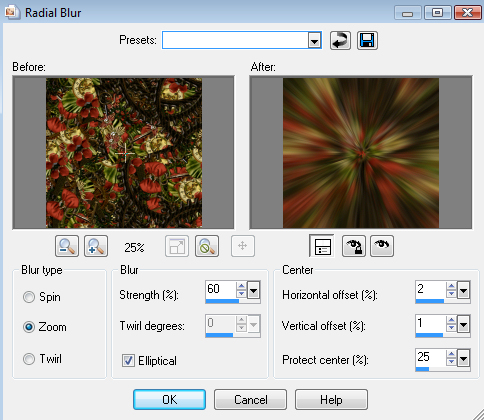
Then Adjust - Blur - Radial Blur with these settings
Dupliacte it and on the copy add DBV mask 106, merge group
On the original add DBV mask 09, merge group, duplicate it twice and merge the 3 layers
down on eachother. (stand on the last duplicated and merge down, then merge down again)
Add Alien Skin Xenofex 2 - Constellation to it at these settings

Use the move tool to move the frame a little to the right and a bit down, you can always
adjust it along the way ;)
Above the frame, add Yolandas Cluster, resize to 65%, Adjust - Sharpness - Unsharp Mask
Radius 1, Strength 100, Clipping 10.
Then add Flaming Pear - Glare at these settings

And do the Adjust - Sharpness - Unsharp Mask once more.
Move it so it just covers the clock that's in the frame under it, see tag for reference.
Add the wordart, resize it to 25%, use the manual color correction tool to change color to #4e0c00 .
Then Effects - 3D Effects - Inner Bevel with these settings.

Move it down to the left. I also gave it a subtle color mix using Eye Candy 4000- HSB Noise on these settings

Now add the tube you wanna use, here's what I've done with mine, if you're using the same one ;)
Add it behind the cluster, mirror and resized to 80%.
Duplicate it and move one below the frame, then use the Eraser Tool to remove access on both skirts
for the color adjustment I've used the same sharpening as above,
then duplicate both tube layers, and on both changed blend mode to Overlay and Opacity to 69.
Drop shadows:
On the frame and cluster -1, 4, 40, 4.
On the girl 1, -2, 40, 4.
Add proper ©
and my name was made with BickhamScriptFancy2, color #0c1804, with a subtle glow using
Alien Skin Impact - Gradient Glow, color #c57f0e.
CLose the white background and save as a PNG
And you're done
Hope you've had fun.
What an awesome tag, I love tags like this. Thanks for sharing with us.
ReplyDeleteJanet
super, thanks!
ReplyDeleteLoved doing this tutorial. Thanks
ReplyDelete