This tutrial is written by me using PSP 10 and Animation Shop 3
Any similarities to other tutorials is purely coincidental and unintentional.
All materials and tubes used are copyright to their respective owners.
Supplies
My wordart and frame here
Licensed artist work is by Elias Chatzoudis
Plugins used
Penta - Dot and Cross
Penta - Dot and Cross
Eye Candy 5: Impact - Gradient Glow (on the wordart)
Let's start
Open a new image 600x600 flood fill white
add the heart frame and color it to compliment your tube
Add your tube of choise, duplicate it and mirror, move the mirrored one
below the frame and resize to 120% and position it to your liking.
To remove the access use the magic wand,
select inside the frame layer and expand by 9
(selections-modify-expand)
selections - invert and hit delete.
then selections - invert again
add a new raster layer, pick a color for your background and flood fill it.
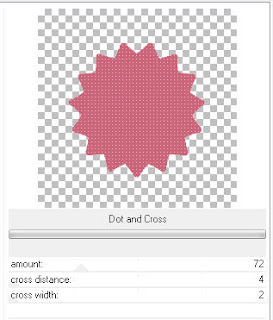
Add Penta - Dot and Cross with these settings

Now use the move tool to position your original tube on top
keep the selection, hit invert again.
This is how I remove access when I want my tube to be standing inside
a frame, I think it gives the nicest result.
Duplicate it and move the original below the frame hit delete to remove
the access of the layer below the frame.
Now deselect.
Move back to the tube on top, take the eraser tool, use the round shape
and delete the parts covering the hearts at the bottom, don't worry about
and delete the parts covering the hearts at the bottom, don't worry about
accuracy, you have the copy below to fill in the gaps;)
Give the tube a drop shadow (-3, -4, 60, 9, chose shadow on new layer.)
you might see shadows sticking out like below,

just take your eraser tool and erase the parts of the drop shadow that aren't
supposed to be showing.
There's several ways of doing this, so stick to the one you like best ;)
Add the wordart, recolor it if needed, I made it for this tut
so the colors were made to match her hair ;)
I've also given it a 2 colored gradient glow, and a small drop shadow
Time to add your letters in the hearts
I've used Fortunaschwein, play with size to fill the hearts
Do one letter at a time and rotate it with the handle before you
convert it to raster layer and start on the next letter,
When you're happy with the position of them merge them down together
I positioned my name on the left side, then used Image - free rotate
right by 168. you might have to rotate with other numbers
depending on wich hearts you use.
merge the 2 name layers down together
Add proper © and license.
Then we're ready to animate
Open ani shop 3
Take the eraser tool, make the round shape big (I had it at 85)
so it erases each letter without any more work than one click ;)
First you close your name layer
Edit - Copy Merged (or just hit Ctrl+Shift+C)
in Ani Shop paste as new animation
back in PSP open your name layer
Edit - Copy Merged
then in Ani Shop paste BEFORE current
then in Ani Shop paste BEFORE current
back in PSP use your eraser tool and click out the last letters on each side
(in my case the S's)
Edit - Copy Merged
in Ani Shop paste BEFORE current
Back in PSP erase the next letter (mine is B)
Edit - Copy Merged
in Ani Shop paste BEFORE current
do this until you've erased all but your first letter.
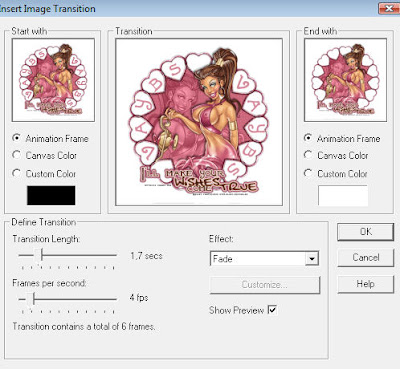
now in Ani Shop right click on the frame with your whole
name and chose Insert Image Transition
Apply it with the settings you see below.

Then select all frames and change frame properties to 20
before saving it
And you're done!!
Thanks for trying it out, and hope you've had fun!!
I'd love to see what you've made of this.
Tutorials are © Tutorials by Vaybs
All rights reserved


Hei Vaybs,stilig tut, må få prøvd den en dag.,
ReplyDeleteGave til mine venner
Ha en flott dag.
Klem fra Betsy