This tutrial is written by me using PSP 10 and Animation Shop 3
Any similarities to other tutorials is purely coincidental and unintentional.
All materials and tubes used are copyright to their respective owners.
Supplies


Licensed artist work is by Armando Huerta
Plugins used
Penta.com - Dot and Cross
Fonts of choise, I've used Penshurst and Opulence JF
Lets start
Open a new image 550 x 550 flood fill white
Add the frame, resize to 70%. Add backgrounds in the frames
and the image you want in each frame.
Duplicate the images and mirror them, we'll animate later
so they change windows. merge down the 2 images that are gonna
be used together so you'll have less levels to think of ;)
Give the images and the frame a drop shadow.
Add a raster level above the white background, flood dill
it in the same color as in the frames (#d57493 in my tag),
add the mask and merge group.
I duplicated it too to make it a bit heavyer ;) merge down the 2
if you do.
Add Penta.com - Dot and Cross . Change settings to 170, 6, 3.
Add the bow, resize and place it, duplicate and mirror,
add a drop shadow.
Add the pin, resize and use the pick tool (K) to tilt it a bit to the left,
erase a bit at the end of it and give it
a drop shadow, only this time, hit the box for shadow
on new layer, the layer will be chained to the pin so you wanna unlock it
(Stand on the shadow layer. Look above the layers, you'll see a bow with a bit
of a chain and a number, you wanna click it till it says "None")
Then use the pick tool to rotate it a bit to the left and move it into the pin,
makes the pin stand up more ;)
Add your tube in front, place it and give it a drop shadow.
duplicate and mirror it, move the mirrored layer down below the
frame backgrounds and change blend mode to soft light.
You might like another mode layer, depending on your colors,
just play around with it ;)
Add the text you'd like under each window, play around with
the text sizes ;)
Add your name and proper ©
then we're ready to animate.
Open ani shop 3, copy merged and paste as new
animation in ani shop, we want 2 identical of the first layer, so hit the paste after
current button to add it. Back in PSP open the other tube layer in the
frames, closing the one you've used, copy merged again
stand on the first frame in ani shop and paste after current.
Now you've got 3 frames right ? ;)
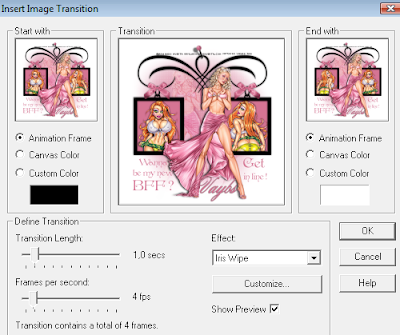
Stand on the first frame, rightclick and choose Insert Image
Transition, choose the settings as shown below;

Hit OK, go to the second to last frame (frame 6) and add the same Transition again.
Animate and save ;)
And you're done!!
Thanks for trying it out, and hope you've had fun!!
I'd love to see what you've made of this.
Tutorials are © Tutorials by Vaybs


No comments:
Post a Comment