

This tutrial is written by me using PSP 10 and Animation Shop 3
Any similarities to other tutorials is purely coincidental and unintentional.
All materials used are copyright to their respective owners.
Supplies
My Black'n'White kit here
I'm using the artwork of © Keith Garvey
To use it you gotta purchase a license through MPT here
Plugins used
Alien Skin Xenofex2
Alien Skin Xenofex2
and Alien Skin Eye Candy 5: Impact
Font used is 1 Archer DNA
Let's start:
Open a new image 600x600, flood fill it white.
Add a paper, I've used nr 1 ad the mask to it and merge group.
Add frame nr 8 then frame nr 6 on top of it.
Add an image in the little square frame and add another tube in front.
Add the dangling heart, resize to 60%, place it on one side,
duplicate and mirror.
Add a flower I've used element 11, resize to 35%
duplicate twice and place them as you like
add a nametag on top, I used the white one (element 18)
resized 50% and use the pick tool (K) to tilt it a bit.
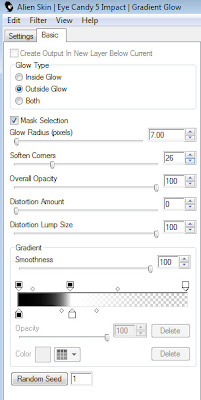
Then add the wordart, resize to 20% and use the manual color
correction tool to change it from black to white.
then give it a double black and white glow
here are my settings:
Go to the dangling hearts, merge them down so they're on one
layer, then duplicate them 4 times, close the original and keep as backup.
Use the Freehand Selection tool
Selection type: Point to point
Mode: Replace
Feather and smoothing : 0
Anti-alias checked
Make a selection around just the content in the heart.
Then hold down the Shift key while you do the same
selection in the other heart too.
Then add the constellation - Bling Bling, with these settings
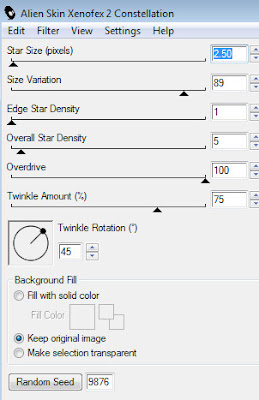
Add it to all 4 copies of the hearts, just click the Random Seed button
for the other 3 layers.
I've also added the same bling bling to the girls diamonds.
Use the same Freehand Selection tool to make your selections.
Add proper © and add your name to the nametag.
Open Ani Shop 3
Close 3 of the 4 heart layers, and 3 of the 4 Main tube layers
if you've animated on her too ;)
Hold down CTRL+SHIFT and hit C to copy merged
hit CTRL + V in ani shop
open the next layers in PSP and close the used ones
copy merged again and paste after current in ani shop
do the same to the 3rd and 4th heart and tube.
Then CTRL+A to select all 4 frames
change Frame properties to 20, view animation and save it.
And you're done :))
Hope you've had fun!!
Hope you've had fun!!
And congratulations on a new tag :))
Tutorials are © Tutorials by Vaybs
I find your Sight so wonderful I love it and will recommend it every where I go. I search all the time for tutorials and so many times almost every sight I go to is pay for everything or Tutorials where you have to belong to a group to get a kit I am really happy to find your sight: ) Thank you for everything!!!
ReplyDeleteThanks so much for this tut vaybs! This rocks!! xo hugs
ReplyDelete