

This tutrial is written by me using PSP 10 and Animation Shop 3
Any similarities to other tutorials is purely coincidental and unintentional.
All materials and tubes used are copyright to their respective owners.
All materials and tubes used are copyright to their respective owners.
Supplies
Glittery Glass Xmas Kit Here
Glitter Doodles Here
Santa Baby Wordart Here
Licensed artist work is by Keith Garvey
Plugins used
Alien Skin - Eye Candy 5 Impact
Alien Skin - Xenofex 2
Font of choise, I've used JackieO
Let's start
Open a new image, 650 x 550 flood fill it white
Add frame nr 5, pick 2 papers,
use the magic wand to select inside one of the circles,
selections - modify - expand by 4, copy your choise of paper,
add a new raster layer below the frame and paste
into selection (Ctrl+Shift+L), deselect.
Do the same in the other circle, then merge the to paper layers
down on each other.
Duplicate the paper layer 3 times (close the original, I like to
keep an original)
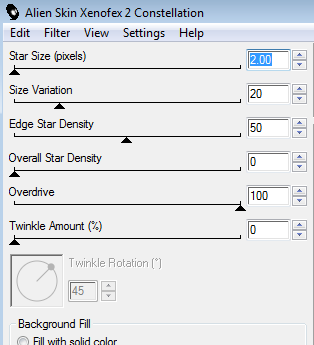
Add xenofex 2 Constellation - bling bling
with these settings to all 3 paper layers
just changeing the Random Seed button on 2 of them.
Now you're ready to add decorations as you'd like
My star, heart and bell is resized 50%, and remember to sharpen
things you resize alot ;)
My doodles are resized 80 %, flower 35 %, bow 60 %,
holly 50 %, candy cane 60 % and wordart 80 %
Also added a very suddle white glow
(alien skin - eye candy Impact) to the wordart
Add your name, I picked a golden color and duplicated it 3 times
added a red glow on my original layer
then added noise (uniform, monochrome, 40, 45 and 50)
to the 3 duplicated layers.
Now to give your frame a glass look
Add a new raster layer just below the frame
Use the magic wand to select inside both circles (hold down the
shift key to select the second one)
Go back to your new layer, then add Eye Candy Impact - Glass
choose clear under settings then with these basics
 and this lightning
Remember to add the proper ©
And drop shadows ;)
Then we're ready to animate
close all but one paper layer and noisy name layer
(remember to keep the glowing name layer open for all 3)
merge visible and copy
paste as new animation in Ani Shop 3
add the next 2 frames by opening the next paper and name,
closing the used ones.
Then we have 3 frames and can save it ;)
That's it
Hope you've enjoyed it.
If you have any questions don't be affraid to ask them in a comment below
or if you just wanna show it off, please do so
and I'll add them to the show off on the side ;)
Tutorials are © Tutorials by Vaybs
Thank you for a great tut and sharing your word art, doodles and scrapkit.
ReplyDeleteCindy aka cindydaisylover
AWESOME!!!
ReplyDelete