Welcome to Tutorials by Vaybs
Here you find all my tag tutorials using Paint Shop Pro (I use PSPX) and Animation Shop 3.
They're all made with FTU elements ;) And if I'm doing my job right you might pick up a few new ideas and tricks on the way.
All links open in a new window;)
Layout tag is made with my Betsys Paradise Dream kit ;)
Have fun!!
Showing posts with label Tips and Tricks. Show all posts

10 May 2009

Setting up Ani Shop and animating

Been PSP'n for some years now and I tend to forget that
some of you are just starting out and need things explained better
so I'm making this one to refer to for those
who are beginners with Animation Shop 3


First let's look at File - Preferences - General Program Preferences
Here are the settings mine is set too.


Paste after current
is this buttons function, you just hit it to add the next layers
behind your current one, every time you copy a new one
from PSP
View Animation
Hit this button to see the animation, and then go on to save it.

When you're ready to save an animation File - Save as...
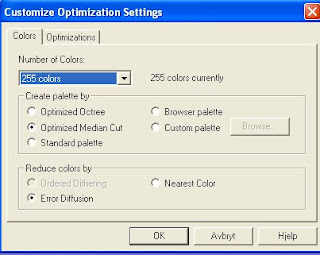
hit customize... when you're on the box you see below


The only thing I might change on the 2 boxes you see below is to vary
between Optimized Octree and Optimized Median Cut (in the first bow below)
Depending on if the first save looks grainy I might try the other option
to see it it looks better.

Other than that you don't have to go in here every time you save
just hit Next on all the boxmessages you get in your saving process.


Think I've managed to cover most of the general things you need
to do my tuts ;)
If you have other things you need explained don't hesitate to ask
I might be able to help ;)

12 Oct 2008

Manual color correction tool

I don't know why PSP have decided to keep this awesome tool
so well hidden and not out on the table where it belongs.
It's the tool to use when you want to change elements to whichever colour you might need.

Basically, its the tool you never knew you needed but absolutely love when you find it, and will wonder how you ever managed without it. 

This is the button I'm talking about 


If you don't have the Manual Color Correction button visible :-

On your toolbar go to View - Customize
On the Commands tab choose All Commands 
Scroll down the list of tools in the box & find the Manual Color Correction button


For easy use you can place into your toolbar, to do this:

With the box visible, as the previous screenshot,
Click on the icon with your mouse and holding it down, you can drag it out and place it where you like in your toolbar. 

This is where I've got mine


Now you know where it is, to use it just highlight the layer of the
element you want to colour change and click on the icon you've just placed
into your toolbar 

then you get this box


In this example I've used a greyscaled butterfly to show you 
I've had it in Effects - Photo Effects - Black and white film first 
(play around with the filter color and see what looks best there)

If the element has just one colour you don't need to greyscale it, 
but often when it has 2 or more colors you might struggle to get a colour you 
want without greyscaling it first.
On the image above you see I've picked a dark grey from the butterfly
and chose a green as Target colour.
(just rightclick on the butterfly to the left, the before shot, to pick source colour, 
play around with it, and you see the different results you get on the right, 
it's real fun )
If you have the tag you're working on beside the window
you can just click on a colour from your tag to pick it for your element.
When you find the colour you want to use, just click on the image to fix it into the source box and OK it.
Can't believe it took 3 years before I came over someone mentioning this
button, now I can't live without it !
Anything else you wonder about, just ask .


Visits since Nov 24.2009

free counters